by Lilia | Jun 27, 2020 | Help
What is Segmentation and Why Use It?
Email list segmentation is a technique that email marketers use to send highly targeted emails by dividing their list up into smaller groups, or “segments.” The goal of segmentation is to provide more relevant content to your email recipients.
You want your marketing campaign to be as precise as possible so the right message can hit the right people at exactly the right time. For this, email segmentation is an absolute must.
How to Segment Your Email Lists
In BigMailer, you can segment your campaigns on:
- Your custom fields. For example, last order date or subscription status.
- Pre-defined fields like DateAdded and Email, specifically email domain (e.g. gmail.com or yahoo.com).
- Campaign engagement – sends, opens, clicks on a specific campaign or any campaigns in a given time period.
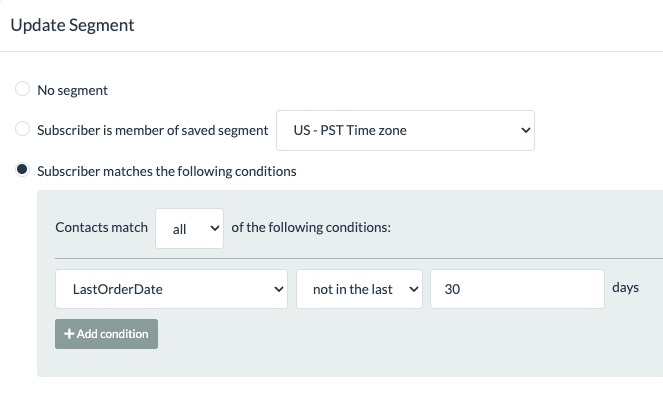
Here are some examples of segmentation rules you can use in BigMailer with screenshots:
DateAdded – this value is added when a contact is added to BigMailer:

Campaign engagement – sent/not a specific campaign:

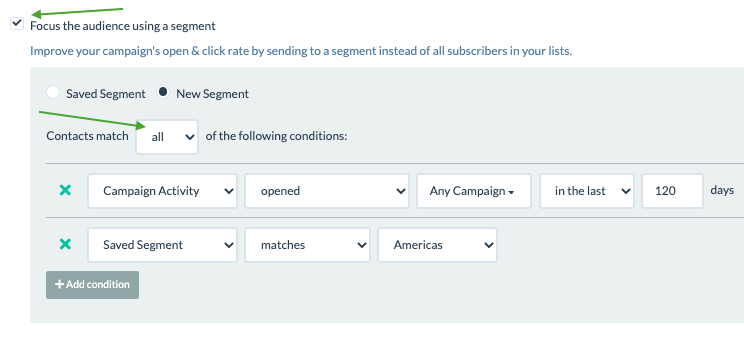
Campaign engagement – opens on a specific campaign or any in a given time period:


Campaign engagement – clicks on a specific campaign or any in a given time period:

You can combine your inline conditions and your pre-defined segments with either ANY or ALL rule.
If you’re reading this, that means you’re serious about creating the most targeted email campaigns possible. And we are here to help.
Before you’re able to segment your audience, you need to get their emails and collect relevant data. Using BigMailer webforms to collect your subscriber data gives you a few advantages. For example, we automatically capture your user’s IP address (but we don’t save or store it) and convert it to non-PII data points (country, state, city, zip code, and latitude and longitude), which allows you to target your audience by location.
Need ideas on how to leverage segmentation? Check out this article – 50 ways to segment your list from OptinMonster.
Want to learn more about email marketing? Head over to our email marketing automation or email deliverability guides.
Happy email marketing!

by Lilia | Jan 30, 2020 | Guides, Help
You can use BigMailer webforms to collect emails and any other subscriber data completely for free. You only have to subscribe and pay when you start sending emails above the limit on a free plan.
This article outlines how to use BigMailer forms on your site, but you can also build landing pages with forms in BigMailer that can be hosted on our URL or your own custom URL (e.g. lp.yourwebsite.com).
How to Create a Webform in BigMailer
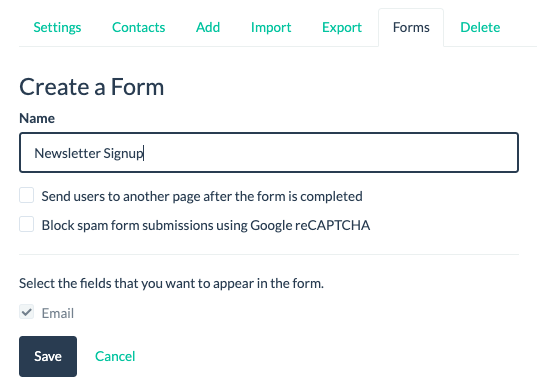
First, you need to create a List that you want to collect your data into, then click on the arrow down icon next to your List name and select “Forms” in the options menu. On the next page click “Create Form” button, give it a name and select the fields you want to use for this form.
If you want to collect additional fields in your webform you need to define them on the Fields page first – click on your brand name in site header and select “Fields” in the options menu. See section about field management below.
To protect your webforms from bots signing up for your emails you have the option to add reCAPTCHA to your forms during the form creation step (see screenshot).
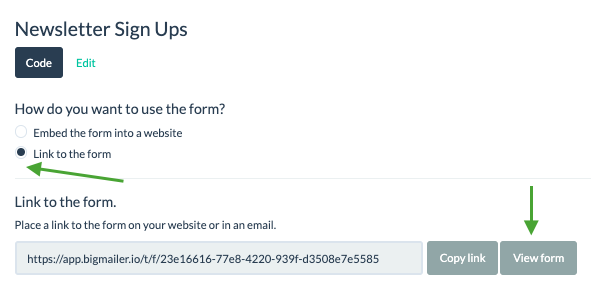
You have 3 options for using BigMailer webforms:
- You can host your signup form on BigMailer and just use the URL we provide.
- Embed the HTML code BigMailer generates into your website. You may need to customize the style of the form to make it fit the appearance of your website.
- Use BigMailer landing pages built with a drag-n-drop editor and add styled forms.
Securing Your Forms
If your website or forms aren’t properly secured, your confirmation or other automated emails can be used for list bombing.
Email or list bombing occurs when bots flood an email address with hundreds of emails to distract from important emails and hide financial fraud. Any senders with automated emails like DOP, welcome, or RSS can be abused with a list bombing attack, resulting in poor deliverability for the sender.
Make sure your site uses SSL and HTTPS and consider enabling reCaptcha on your webforms to prevent bot signups. You may still get smart bot signups, so if you see a big spike in your list size you should promptly investigate. You may be able to identify patterns in bot signups and use segmentation to filter those out from your welcome or DOP emails.
Managing Fields
There are 2 ways to create new fields in BigMailer:
- Add them on the Fields page (under your brand name in the header) before importing or collecting data.
- Create new fields during an import where you can map your columns to new fields you define.
Once you define fields they can be used to:
- Generate a webform to collect data outside BigMailer platform
- Customize your email template with use of merge tags.
- Segment your audience on campaigns or exports
You need to select a correct data type for each field you create, so you can use appropriate operators (equals to, greater/less than, etc) when segmenting on those fields during campaign creation.

You should add some sample values for all fields, they will be used as merge tag values in any test emails you send. Without these sample values your test emails that use merge tags can go into Spam folder or not get delivered at all.
Adding Your Webform in WordPress
If you use WordPress to manage your website you will need to use a HTML module type to add webform code to a page. Most WordPress installations and themes have this module type.
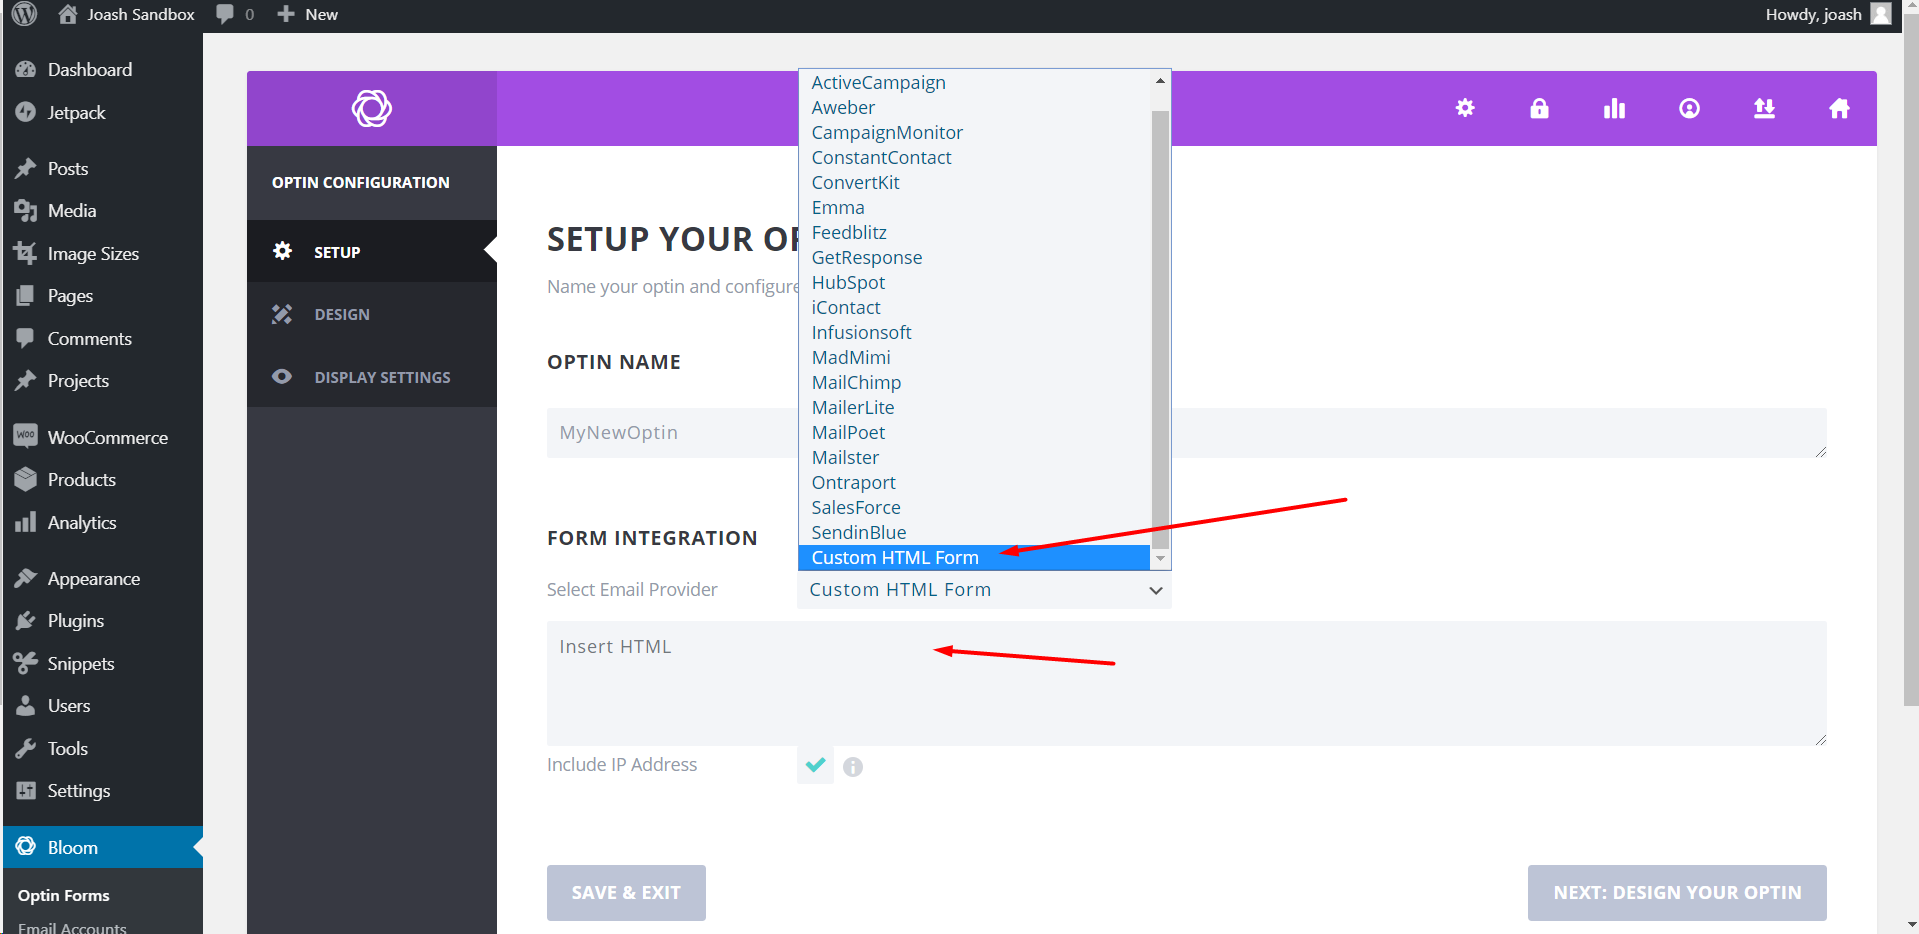
You can integrate BigMailer forms with Bloom plugin from Elegant Themes using the “Custom HTML Form” option.
If you are using WPforms you can use this plugin to integrate with BigMailer forms.
Customizing Your Webform
By default, BigMailer HTML webform code is un-styled, so you need to customize it to add relevant styles to the code, typically just a class attribute on the form and each field.
If you want to use a different input type you would need to modify the code. A common need for converting input type is to change a field into a dropdown with answer selection. You can change the element name from text to a select type, see example of the HTML code for a dropdown field. Just make sure to keep the field name that was generated by BigMailer.
You can also customize the confirmation message provided to any text you would like or redirect to another page on your website after successful form submission.
If you are not comfortable with HTML code, consider building landing pages with forms in BigMailer using a drag-n-drop editor.
Happy list building!

by Lilia | Jan 15, 2020 | Email Marketing, Guides
With crowded consumer and business inboxes, email deliverability and inbox placement has become a top priority for marketers in recent years. Getting emails flagged as spam or blocked by mailbox provider has an impact on sender reputation and future inbox placement.
Many marketers use “deliverability” as an equivalent to “inbox placement,” but the terms are not the same. Emails that go into Spam folder are considered delivered, where is marketer’s goal is to ultimately get emails into subscriber’s inbox.
The major factors that affect deliverability are:
- Global engagement (overtime, across campaigns)
- Content and format of the email (spam words in subject or message body, format – use of images, etc)
- Relative engagement for you (sender) versus other senders in the recipients inbox
- IP reputation
- Sender reputation (e.g. sender being your domain or exact email address the emails are sent from)
- Server and domain configuration (DKIM, SPF, etc)
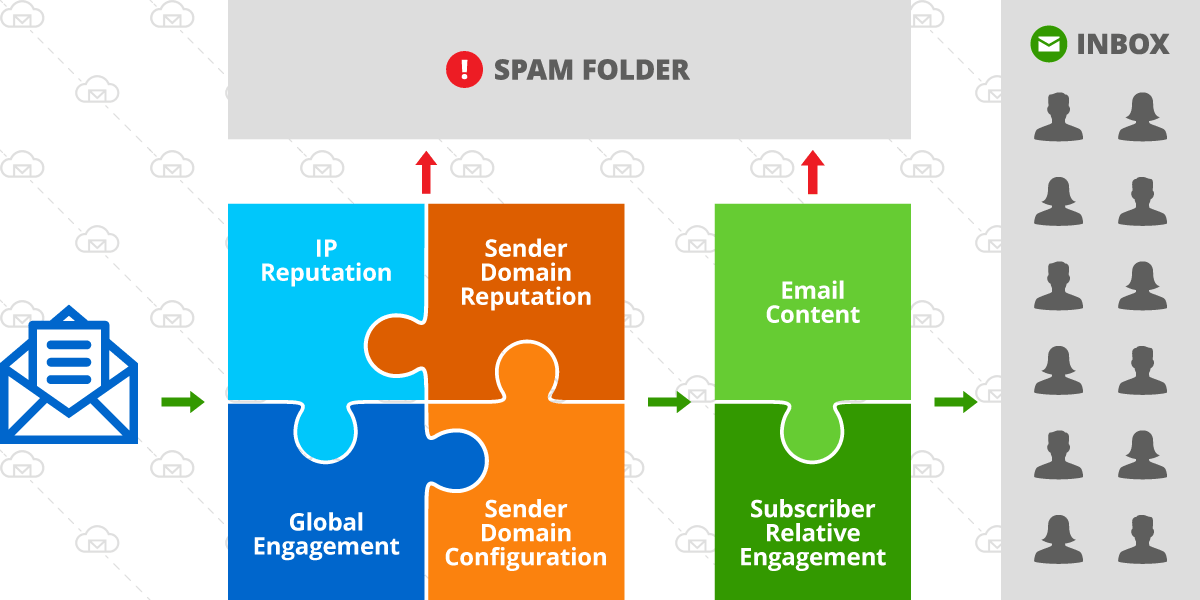
Email deliverability factors
On the diagram above, the green box represents factors that vary and change more with each campaign sent and the square on the left with 4 factors are not subject to dramatic changes on a per campaign basis. In this guide, we are covering 5 out of 6 factors, but you can learn more about IP reputation management here.
The list of best practices below can help you achieve better email deliverability from building and maintaining a strong sender reputation, while improving your engagement.
Global engagement – keep bounce rate low
An average email list decays at a rate of 2% per month for B2C lists and 3% for B2B lists. The rate is higher for B2B lists because people change work emails more frequently than personal emails, due to job changes. So if you haven’t engaged with your email list for more than 6 months you are likely to have a more than a 10% bounce rate on your first bulk campaign. A bounce rate over 10% can get your account suspended with many email service providers (ESPs), but it also has a negative impact on your email deliverability and sender reputation, not to mention cost (since you pay to send email to invalid addresses). Inbox providers pay close attention to bounce rate and may block emails from a sender that attempts to deliver to invalid email addresses.
At BigMailer, a bulk campaign with a bounce rate over 8% (default, configurable by customer) is automatically paused to protect sender reputation.
Old and unengaged lists should be validated before being imported into an email marketing platform. Most email validation providers recommend that you validate your entire list once a month, or before every campaign you send, to keep your bounce rate as low as possible. While that tactic can be pricey, the good news is that most email validation providers offer great volume discounts for purchasing credits in bulk (that usually never expire).
We have partnered with low-cost email validation services Bouncer (GDPR compliant, recommended for customers in Europe) and TheChecker to get our customers a discount on their services.
Email content and format (including email headers and links)
1. Use a custom tracking URL in your emails
Using a custom tracking URL in your emails can help your emails appear more authentic and help with inbox placement. Consider customizing tracking URL for your emails, using the same domain as your sender address. For example, if your sender is sales@your-domain.com you can use email.your-domain.com as your tracking URL.
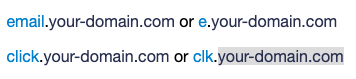
Examples of commonly used tracking sub-domains
This will require updating your domain’s DNS records (to create that email subdomain and map to email provider servers) and then adding the updated records to your email provider’s platform as a configuration or setting. Most market leaders allow this, although some call it white labeling and most charge extra for it or make it available on higher tier plans.
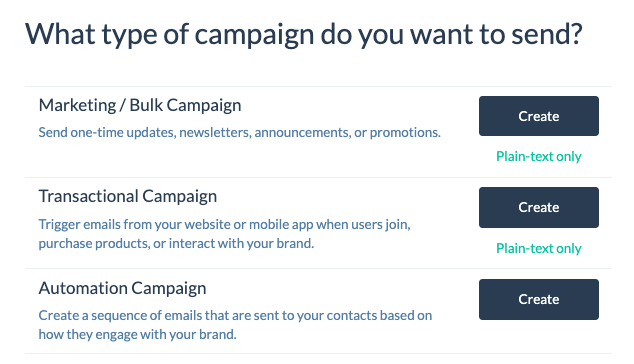
2. Create a plain-text version of your email
While only a tiny fraction of your audience may see the value in a plain-text email, SpamAssasin, a widely used spam tool, considers it essential. The tool assigns two points to your email if no plain-text version is available. If your message reaches a score of seven, it’s identified as spam, so two points is a pretty big penalty for something that’s fairly easy for a savvy marketer to execute.
While some email platforms (like BigMailer) will auto-generate a plain-text version from the HTML version, most of them don’t require one. If you have to create a plain-text version yourself, don’t cut corners – it should match the message in the HTML version and not be any shorter. Check out this article from Litmus for more guidance on formatting plain-text emails.
3. Make it easy to unsubscribe
Making it super easy for users to unsubscribe is not a tactic that’s obvious to benefit the sender, but it is. If email recipients can’t easily locate the unsubscribe link they are likely to hit the Spam/Complaint button instead. Complaint is the worst type of engagement for your email campaigns.
Your unsubscribe or “subscription preferences” link needs to allow a user to either opt-out from your brand communications or select the message types they want to receive (see the example below) and not to a page that requires them to log in to their account to retrieve or save their preferences. The latter has become a more prevalent practice among some high profile brands that use their own built-in-house email tools. This practice is actually in conflict with anti-spam laws. It’s advisable to provide users with a straightforward method for getting off an email list and honor that request in a timely manner.
It may be helpful to offer subscribers a way to opt out from certain communications instead of all brand communications at once. Providing this option has become even more necessary with the introduction of General Data Protection Regulation (GDPR) laws in May 2018, which states that the consent to receive emails should be explicit and not be bundled (e.g., if subscribers only opted in to receiving product updates, you can’t additionally send them promotional emails or messages on behalf of your partners).

Example: BigMailer.io unsubscribe page with preferences format
4. Specify a useful sender (from) address
Be it a question or general feedback, email recipients commonly want to respond to the messages they receive. For this reason, it’s best if your reply-to email address is one that goes straight to your support team (or at least forwards to them). You don’t want to discourage your subscribers from responding to your message by using a no-reply address, such as noreply@your-domain.com, because replies are part of the engagement metrics that some email service providers (Gmail, for example) use for determining the importance of your email and whether it belongs in the inbox or spam folder.
Another consideration is that customers will sometimes request removal from a mailing list, and if they see noreply@your-domain.com they are more likely to hit the “Spam” or “Complain” buttons instead – complaints are the worst form of engagement you can have on your email campaigns.
Lastly, no-reply addresses run a greater risk of being sent automatically to the junk folder. As this GlockApps article states, “Some ISPs, network spam filters, and customers’ personal email security settings are set up to move messages with ‘no-reply’ addresses to the junk folder.“
In short, if you care about your email campaigns’ engagement rate and future deliverability, specify a meaningful sender address for and avoid using a no-reply email address.
5. Use a descriptive Sender label
While a clever subject line can certainly help you stand out in a crowded inbox, your subscribers will still need to recognize your brand’s communication when they scan their inbox. You don’t want them left wondering why they’re getting an email from someone they don’t know with a cryptic subject line that promises to solve pain point XYZ.
Consider these three basic options for sender labels:
- Brand or Product Name
- Brand or Product Name + Function (e.g., Support, Sales)
- First Name at/from [Brand or Product Name]
With the third option, consider the name of the person as well as your product name. Is your product name a single word, one to two words or longer? Will the entire label fit in the “From” field? Whatever format you choose, make sure to be consistent across all of your sender accounts and test for appearance before you start using a new sender label.
6. Use preview (aka preheader) text
While it isn’t always a visible element of your email’s design, preview text provides valuable real estate to expand your message. You should think of it as a second subject line – an additional opportunity to convince your recipients to open your email. The better your open and engagement rates are, the better chance you have of landing in the inbox. Many platforms, including BigMailer, support specifying this text. If your platform doesn’t support it, you can still have a preheader element as part of your email template design.
7. Test emails with spam tools
Testing every email adds an extra step, but it’s an incredibly important one. Because testing typically has to happen outside of an email marketing platform using tools provided by websites like Litmus, Email on Acid or GlockApps, you may be tempted to skip it. You shouldn’t – it may mean the difference between your message being successfully delivered or it being flagged as spam.
With that said, even experienced marketers using these tools can’t avoid landing an email in the spam folder every once in a while – this is especially true for Gmail and is often due to the topic of the message.
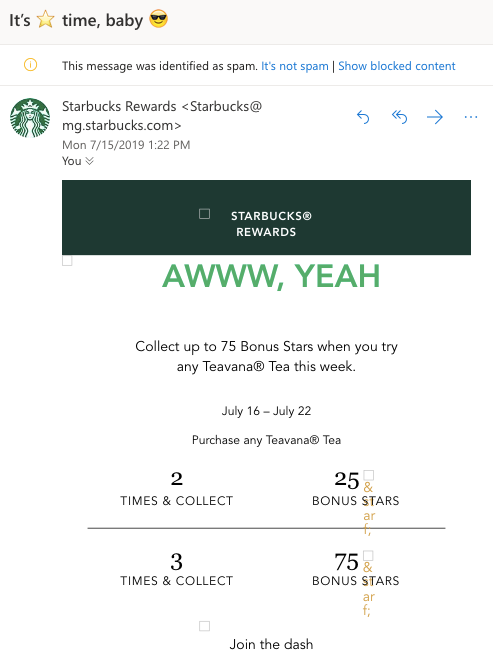
Example of a high-quality email and sender in spam folder
Don’t stress – if the occasional email gets a low engagement rate because a few spam keywords made it into your message, know that you are not alone. It’s become necessary at this point for email marketing platforms to embed email testing into their platforms to simplify a marketer’s campaign workflow. This is exactly what the team at BigMailer is currently working on, and we hope to delight our customers with this workflow improvement soon.
Relative engagement
Mailbox providers keep track of how your email recipients interact with your emails, so you need to maintain a high engagement to achieve a high inbox placement rate. Consider these tactics:
- Periodically remove unengaged subscribers from your list. Identify anyone who hasn’t engaged with (didn’t open) your emails for 90 or 120 days and either permanently remove them, or exclude them from your frequent mailings (you could send them your highest engagement/appeal content or only critical service notifications regarding their accounts).
- Send emails with appealing call-to-actions (CTAs) and make it necessary to click and interact with your email. It may seem obvious, but it’s not uncommon for some marketers to include phone numbers to place orders or have the website address in giant font to make it memorable, which may push a user to simply type the address when they are ready to place an order instead of clicking on a link in an email (and for a marketer to correctly attribute a conversion or sale to the email sent).
- Engage in email exchanges with your customers using the same email address that you use to send emails, or at least using the same sender domain, for example for customer service inquiries. Any email interactions between your and your customers signal trust to mailbox providers.
Consider using a dedicated IP address
IP (internet protocol) address is a unique address that identifies a device (computer or server) on the Internet or a local network. When you start using a hosted transactional or bulk email marketing service, by default, your emails are being sent from a group of servers with different IP addresses, and that group of servers is shared by multiple senders like you. So your emails use a “shared IP pool” and the reputation of those shared IP addresses is shared as well.
The biggest factor in IP reputation is whether it’s blacklisted, which happens when emails sent from a given IP get flagged as “Spam” by the recipients. If the % of complaints is high enough, the IP gets blacklisted and may get blocked by ISPs.
You can benefit from a dedicated IP address IF:
- You are looking for a fresh start and looking to invest in building a strong email sender reputation
- You have a small list now, but plan to grow it fast and monetize it, while controlling cost and ROI by using a low cost provider
- You have built up a sizable list (over 20,000 subscribers) and ready to engage it with high quality content
Unfortunately, low volume senders are limited in their options because most low cost bulk email marketing service providers don’t offer an option to get a dedicated IP address on lower pricing tiers. And if you use an ESP that does offer access to a dedicated IP, it may come with a hefty price tag (for example $250 per IP at ConvertKit). If you use an ESP that runs on Amazon SES, like BigMailer, you can request a dedicated IP(s) from Amazon anytime, at a cost of $25 per IP per month.
Manage sender reputation – keep complaint rate low
Just like with an IP reputation, the sender reputation is affected by email recipients marking the emails as “Spam”. An industry benchmark is to keep complaint rate below 0.1%, but it’s more nuanced than that. The lower the volume of sending the less sensitive a mailbox provider is to the complaint rate, due to statistical insignificance (just 1 complaint can change the ratio dramatically). High volume senders have to be more vigilant – being close to the 0.1% ratio can trigger a manual campaign review from an ESP they use and can be followed by an account suspension.
A site/domain can also be blacklisted as unsafe with various monitoring services, like Google Save Browsing. You can monitor your domain/IP health by signing up with various providers, like Google Postmasters, or blacklist monitoring services.
Manage your sender domain identity
While this step is optional with most email service providers and requires a little more technical knowledge than the other items in this guide, most email platforms allow you to configure Sender Policy Framework (SPF) and DomainKeys Identified Mail (DKIM) for your domain to help improve your sender reputation by making it appear more authentic and safe. We highly recommend getting both SPF and DKIM configured for every sender domain you use to send emails.
Use a different sender domain and IP addresses for any cold email campaigns, which have the lowest engagement and can burn your sender reputation. You may want to consider using a different sender identity for your marketing and transactional emails as well, to ensure your transactional email delivery doesn’t get affected by your bulk campaign practices.
Did you find this article helpful? Were you able to find a few useful practices to include in your email campaigns? Please leave a comment – I would love to hear from you.

by Lilia | Oct 8, 2019 | Help
Using a Zapier integration you can connect BigMailer to hundreds of other platforms and applications. You can sync up your customer records with a CRM or another ESP, or add records to BigMailer when you acquire subscribers or customers in other platforms.
Below is a list of actions and example scenarios that can be setup.
IF [something happens elsewhere] > Add a contact to BigMailer brand
Examples:
IF a new response is collected via Google Forms add a contact into List [some-name] in BigMailer
IF a new row added to Google Spreadsheet add a contact into List [some-name] in BigMailer
IF a new contact is added in [some other ESP] also add a contact into List [some-name] in BigMailer
IF a new customer/sale/order is added in [some platform] add a contact into List [some-name] in BigMailer
IF a contact is added in BigMailer > DO [this action somewhere else].
Examples:
IF a new contact is added to List [Member] in BigMailer also add a record in [some platform].
IF a new contact is added to List [Paying Customer] in BigMailer send a message via [Gmail/Slack/other].
How to Create a New Zap with BigMailer
Log into Zapier with your account, then go to this page and click on “Accept Invitation & Build a Zap”.
When you choose an app in either step 1 or 2, search for “bigmailer” (no space) then select a BigMailer app listed.
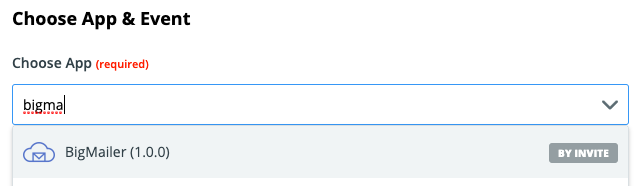
Zapier: find BigMailer app
Once you select the action, you will be asked for an API key to complete the step and a link to the page to copy API key will be provided.
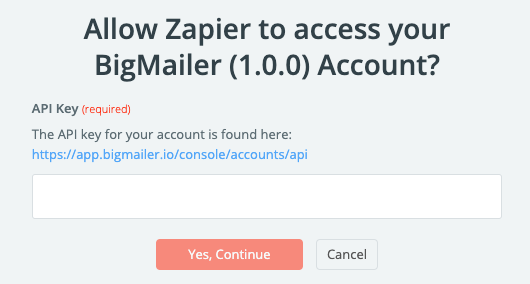
Zapier: authorize BigMailer with API Key
Need an action not listed? Reach out to us via chat to request it.