Advanced Deliverability and Inboxing Optimizations

Advanced Deliverability and Inboxing Optimizations

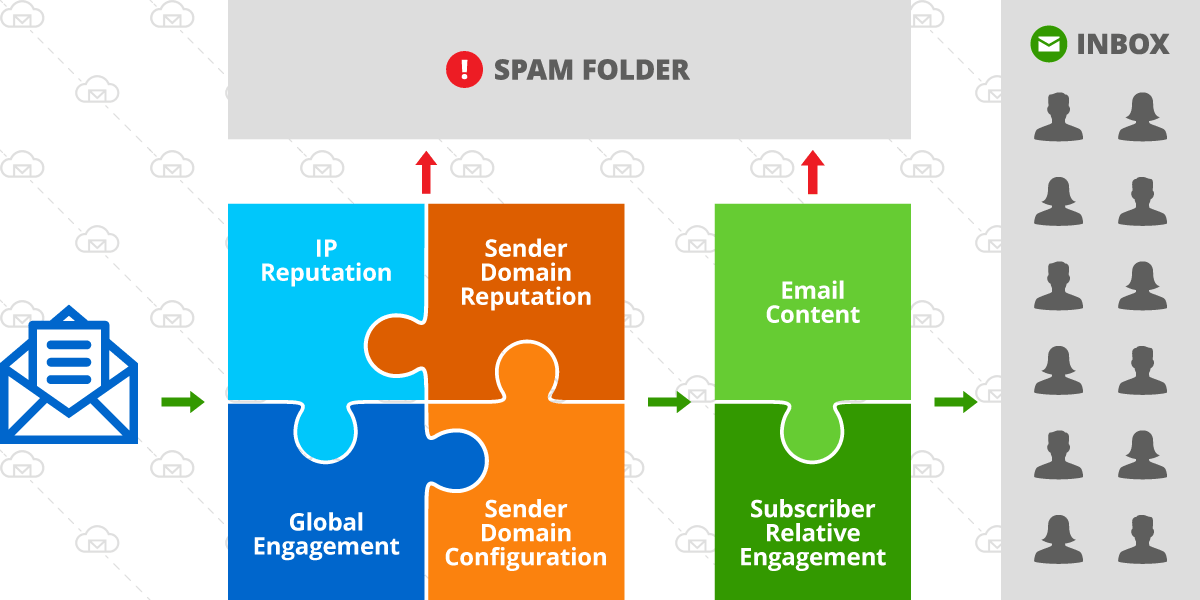
Email deliverability is the ability to deliver emails to subscribers’ inboxes, while email delivery refers to ability to deliver email to mailbox provider server. So when an email service providers (ESP) boast high deliverability they don’t usually mean high inbox rate. Emails delivered are emails not rejecting by the mailbox provider, so emails in a spam folder are considered delivered.

Email Deliverability 101

  1. Maintain list quality – verify, trim unengaged
  2. Make it easy to unsubscribe – don’t use small font or push the link down with extra space
  3. Configure your sender correctly – verify domain, add DKIM and SPF
  4. Optimize sender from label and address – don’t use donotreply@ and noreply@
  5. Avoid spam keywords – especially in the subject line
  6. Segment and customize campaigns – personalization helps with inboxing
  7. Monitor sender reputation – check blacklists
  8. Test your campaigns

This article focuses on advanced deliverability topics, so make sure to review our email deliverability guide to best practices if you want to go over the list above.

What happens when an email isn’t accepted?

A few things, like:

  1. Hard bounce means an email address is no longer valid. No future re-delivery attempts are made.
  2. Soft bounce can happen for several reasons:
    • Mailbox provider service is temporarily down.
    • Recipient mailbox is full.
    • Email is rejected. No further attempts to deliver are made automatically.
  3. Email delivery is delayed. Several attempts are made to re-deliver for up to two days, until the email is either rejected or delivered. The first attempt to re-deliver is made in about 20 min, then a few hours. This is why your campaign may appear either healthy or with low engagement, but the soft-bounce rate can jump the day or even two after a campaign is sent.

Common Rejection (Non-Delivery) Reasons:

  1. Higher than typical volume compared to recent history for a sending domain. Large list jumps of 50% or more from one day to the next indicate inorganic list growth due to list renting/purchasing. What’s a safe sending rate increase for a sender domain warmup? It depends on the starting point and how far along in the warmup your domain is.
    • For list sizes under 50K you could increase by 20-30%/day
    • For list sizes over 300K you should stay under 20% per day
    • A brand new domain should start at around 100-300 emails per day and can go up by 50% while under 10k/day, as long as the list is diverse – meaning it’s not 50%+ gmail/yahoo/aol only.
  2. Sender domain reputation – this is a combination of:
    • Hard bounce rate – historical and immediate.
    • Historical complain rate.
    • Sending to spam traps.
    • Reputation of the IP address sending emails. Unless you are paying for a private/dedicated IP address your emails go out from a shared IP pool, meaning a set of IPs used by many senders.
  3. Historical and recent low engagement. This can be split into 2 separate issues:
    • You may see 20-35% on your daily or weekly campaigns, but if it’s the same subscribers opening your emails and 75% of your list is completely inactive that’s a problem.  Mailbox providers don’t like seeing sending activity with no engagement, they see it as abusive and low quality practice.
    • You may see a 20-25% open rate for your campaigns, but upon closer inspection an engagement by mailbox providers report may show that your open rate is high for some providers and very low for others. If you start seeing an open rate drop below 3% for a specific mailbox provider, e.g. yahoo/aol, you need to make adjustments to your sending strategy to avoid rejections.

Advanced Tactics to Improve Deliverability and Inboxing

Identify and Remove Spam Traps

One tactic to improve your sender reputation is to remove spam traps from your email lists. Spam traps are used to identify and monitor spam email by Internet Service Providers (ISPs), anti-spam organizations, and blocklist operators. They are email addresses (also called honeypots) used to identify senders who aren’t following email best practices. If you either purchase your email lists or scrape email addresses from the web there is a good chance you have a lot of spam traps on your list. 

Even if your list is all opted-in, you can still have typo and recycled spam traps on your list. 

You can search your list for common typo domains to see if you have an issue.

search for spam trap domains

If you are a BigMailer customer you can reach out to us to help you determine if this is an issue for you and the most cost effective way to remove them.

Learn more about avoiding, identifying and removing spam traps in our article on spam traps.

Optimize Your Send Time

If you have any location data for your customers you should segment your list into audience by location and time zone, to optimize delivery based on local time. Ideal sending time is typically work hours Monday-Friday 7am-10am for news, content, and business updates. If you have a call to action that requires time to complete (shopping), try lunch time or around 3-4pm local time, and of course test B2C offerings with Sunday late morning.

Good send time is 6am-3pm local time Monday-Friday, while 7am-10am Tuesday-Thursday is typically best. That’s because most emails are checked during typical work hours. Avoid sending after 5pm on a work day – it’s a very low engagement time of day. If you don’t have location for your subscribers you should start earlier and if you do then it’s best to optimize send time based on local time.

Simply don’t schedule your campaigns for top of the hour if they typically deliver within 1hr. That’s because email traffic spikes at that time and yahoo/aol will delay delivery at higher rate.

Deliverability Tweet

Some providers, including BigMailer, automatically capture location on email collection forms and clicks. So you may have location data on your subscribers even if you are not intentionally collecting it.

Improve Engagement

While Building/Growing a List

If you are just starting out, focus on generating and maintaining high engagement with your subscribers. Always send a welcome email with a goal to engage – ask a question (to encourage a reply), offer your best content, etc. This will help ensure future emails go into Inbox for the subscriber interacting with your emails.

Examples of questions to ask in your welcome email:

  1. Tell me who you are? (Useful, if you have different type of audience)
  2. What topics are you interested in?
  3. What would you like me to write about?
Established Lists and Senders

One of the best way to address both low engagement and high complaint rate is to reduce sending frequency to inactive subscribers on your list. When someone checks their email infrequently and they see 2+ daily emails from the same sender they are more likely to complain (report as Spam, or move to Spam folder) and they can flag every email from a sender, not just one.

To land in the inbox you need to maintain high engagement rate overall. Send more to actives, less to inactives.

Mailbox providers like Gmail and Hotmail are very sensitive to historical engagement. What this means is this – if a recipient doesn’t open 5+ emails from a sender in a short period of time (< 2 weeks), the future emails are highly likely to go to Spam. You can test this with your own seed email accounts. The only way to override this behavior is by dragging an email out of Spam folder or labeling it as “Not Spam”. So when you reduce your email frequency you improve your chances for having the recipient open your email before they start going into Spam folder.

Sounds like a lot of work? It doesn’t need to be – you can automate many things in BigMailer. Consider defining reusable segments to use in your campaigns. To create a segment go to Lists tab and click on All Contacts list, click on Search and specify your segmentation rules, then use “Save as a Segment” button. Once a segment is created it can be edited anytime.

Here are some segmentation rule examples that may help if you send emails frequently:

  1. Recently Active – Opened/Clicked Any Campaign in the last X days or recently added Engaged Segment ExampleThen you simply match that segment in your campaign: Campaign segment match
  2. Inactive audience can be used to send less frequent campaigns with the goal of re-activating. Be careful – re-activation campaigns may cause a higher than usual complaint rate. You could simply use the same segment you defined for active subscribers but with the rule “does not match”. Campaign segment no match

Consider your sending frequency when deciding how to define your active subscribers. If you are sending daily, perhaps you only send to those who opened in the last 3-4 days. If you send weekly, a 14-21 day timeframe would be reasonable.

Special Case: Automated RSS Campaigns

If you use a daily automated RSS campaign you could consider reducing frequency from daily to once a week for anyone who doesn’t open any campaigns for 3-4 days, using the same segmentation rules discussed above. You could create a separate RSS campaign and use a reverse rule on a segment so your audience shifts from daily to 1/week automatically and as soon as they open they will shift  back to daily campaign again. You could even take this further and setup a 3rd campaign where audience shifts with no opens in 30 days. This helps you avoid sending to inactives and avoid spam folder overall.

RSS campaigns

Example: RSS campaigns to active and inactive contacts

UPDATE: You can now schedule RSS campaigns in BigMailer for time slots besides top of the hour. Avoid 7am 😉

If you are a BigMailer customer you can reach out to us via chat to get our assistance with your account audit and deliverability. Not a BigMailer customer? Get started with a free account or schedule a demo.

How to setup an AB test on an email campaign

How to setup an AB test on an email campaign

UPDATE: Subject line AB testing is now live. You can use this article to setup other type of AB tests, for example on send time.

What Is an A/B Test Campaign?

An A/B test campaign is a campaign with 2 or more versions being tested on one dimension – typically subject line or send time. A multi-variate test is a test with more than 1 dimension, for example if you are testing 2 different subject lines with 2 different versions of your message body you have 4 total versions and a multi-variate test, to determine the best combination of subject line and message body.

Why Use AB Tests?

AB tests can help you optimize your campaign engagement, by determining best time or subject line to use. If you have a large list (over 50k) you can test a subject line on 20k and use the best one on the rest of your list, improving your engagement overall.

You can setup AB test to determine:

  1. Ideal send time for your brand or list – test early on, then use that knowledge forever!
  2. Best subject line
  3. Best converting CTA in your email body
  4. A combination or all of the above!

Besides producing better results (sales, conversions), higher engagement helps improve your future inboxing.

How to Setup an A/B or A/B/C Test

Step 1: Setup up your A/B or A/B/C segments

Determine how many variations do you want to test – that’s how many segments you need to split your list into. We suggest to define reusable segments using “starts with” condition on one of your custom fields, for example first name.

Random segment example

Then, create a segment that’s basically “not A” to ensure you don’t make a mistake with rule overlap. The example below shows a segment C that’s basically doesn’t match ether A or B, and segment B would be setup similar to A but with different rules.

Random segment B

TIP: Make sure each segment has at least 10,000 contacts in it, so your experiment results are statistically significant.

Step 2: Setup your campaign variations.

Create your bulk/promo campaign, then create copies with your variation – subject line, preview, or message body. Assign a different segment to each campaign, see example in the screenshot below.

AB segment assignment

If you are testing on send time, then your campaigns will be identical, but will just be scheduled to send at different times.

Manual AB test example

Note: The example above is for a B2C list that’s 60%+ Gmail, so those landed in Promotions tab.

TIP: You could create a test using small parts of a larger list, then use the results for the remainder of your list. 

Step 3: Start Testing (almost)

Reach out via chat and request to update your account to allow you to send more than 1 campaign at a time, if you want to test on content and send your campaigns at the same time. By default, accounts have 1 queue and campaigns go out sequentially. If you are on an Agency plan, you already have ability to send concurrent campaigns.

That’s it. If you are a BigMailer customer you can reach out for assistance with this or anything else via chat 7 days a week.

Not a BigMailer customer? Why not try BigMailer for free, with no features locked? We are sure you will love it.


How to Add Webforms to Your Site or WordPress

You can use BigMailer webforms to collect emails and any other subscriber data completely for free. You only have to subscribe and pay when you start sending emails above the limit on a free plan.

This article outlines how to use BigMailer forms on your site, but you can also build landing pages with forms in BigMailer.

How to Create a Webform in BigMailer

First, you need to create a List that you want to collect your data into, then click on the arrow down icon next to your List name and select “Forms” in the options menu. On the next page click “Create Form” button, give it a name and select the fields you want to use for this form.

If you want to collect additional fields in your webform you need to define them on the Fields page first – click on your brand name in site header and select “Fields” in the options menu. See section about field management below.

If you are worried about spam traps or bots signing up for your emails you have the option to add reCAPTCHA to your forms.

You have 2 options for using BigMailer webforms:

  1. You can host your signup form on BigMailer and just use the URL we provide.
  2. Copy/paste HTML code provided into your website. You may need to customize the style of the form to make it fit the appearance of your website.

hosted webform link

Managing Fields

There are 2 ways to create new fields in BigMailer:

  1. Add them on the Fields page (from the menu under your brand name in the header) before importing or collecting data.
  2. Create new fields during the import step where you can map your columns in the file with data to new fields.

Once you define fields they can be used to:

  1. Generate a webform to collect data outside BigMailer platform
  2. Customize your email template with use of merge tags.

You need to select a correct data type for each field you create, so you can use appropriate operators (equals to, greater/less than, etc) when segmenting on those fields during campaign creation.

Example of fields in BigMailer

You should add some sample values for all fields, they will be used as merge tag values in any test emails you send. Without these sample values your test emails that use merge tags can go into Spam folder or not get delivered at all.

Adding Your Webform in WordPress

If you use WordPress to manage your website you will need to use a HTML module type to add webform code to a page. Most WordPress installations and themes have this module type.

You can integrate BigMailer forms with Bloom plugin from Elegant Themes using the “Custom HTML Form” option.

elegant themes form integration

If you are using WPforms you can use this plugin to integrate with BigMailer forms.

Customizing Your Webform

By default, BigMailer HTML webform code is un-styled, so you need to customize it to add relevant styles to the code, typically just a class attribute on the form and each field.

If you want to use a different input type you would need to modify the code. A common need for converting input type is to change a field into a dropdown with answer selection. You can change the element name from text to a select type, see example of the HTML code for a dropdown field. Just make sure to keep the field name that was generated by BigMailer.

You can also customize the confirmation message provided to any text you would like or redirect to another page on your website after successful form submission.

If you are not comfortable with HTML code, consider building landing pages with forms in BigMailer using a drag-n-drop editor.

Happy list building!