There are many terms used by marketers to describe automated emails – marketing automation, auto-responders, drip emails, email sequences, and more. Whatever you call your automated emails, BigMailer supports them. While RSS to email and transactional (via API calls) email campaigns are technically automations, in this article we focus on auto-responders and sequences.
Examples of Automation Campaigns
There are many different type of automation campaigns – here are some of the most common examples:
1. Welcome Email
This can be a single email or a sequence. The 1st email can set expectations on the the type of emails to expect and frequency of updates, and any special offers or coupons that may have been promised for getting on a lit (common for online retailers). Consider including links to your most popular content either in the 1st email or in the follow up email.
2. New Subscriber/Customer On-boarding
These type of emails help your customers get started with a product or service by addressing friction points, answering FAQs, or providing links to helpful resources, and often reduce the number of support inquiries.
3. Nurture Sequence
Feature highlights, usage tips, learning resources, review/rating requests, and customer case studies can help build product loyalty and encourage ongoing use of service and/or upgrades.
TIP: Consider giving your customers sufficient time to use your product/service before asking for a review/feedback.
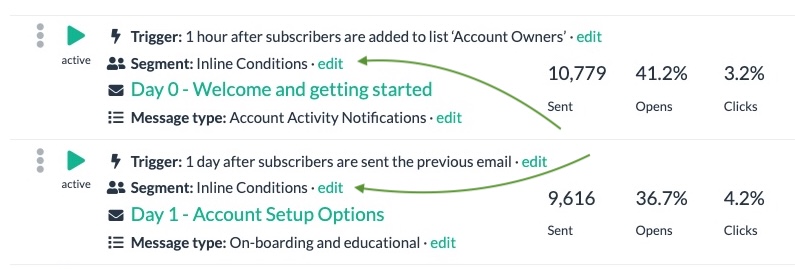
Here is an example of an automation sequence in BigMailer:

4. RSS-to-email Updates
BigMailer allows you to send new blog post email updates via RSS. This type of campaign goes out automatically when a new blog post is published.
Setting up an Automation Campaign in BigMailer
An Automation campaign in BigMailer can be a single email (e.g. a signup confirmation or welcome) or a sequence of emails, that are typically triggered based on something happening to the subscriber record or an action performed. In addition to action, an automated email can be triggered with a time delay in hours, days, or weeks, or have no delay.
After the Automation campaign sends the 1st email the future steps in the sequence can be scheduled in 2 ways:
- Relative to the first email, e.g. X days after the same trigger as the 1st email. For example, you can send a welcome email immediately after someone signs up for your newsletter or creates an account, then send weekly emails after 7, 14, 21 days, etc.
- Relative to the previous email and/or action taken, e.g. X days after a previous email in the sequence is sent or after a contact opens or clicks on the previous email.
Ready to get started? Here are the steps to setup your Automation campaign.
- Log into your BigMailer account and select a brand you want to create a campaign under. Don’t have a BigMailer account? Create a free account – all accounts start on a Free plan, no credit card required.
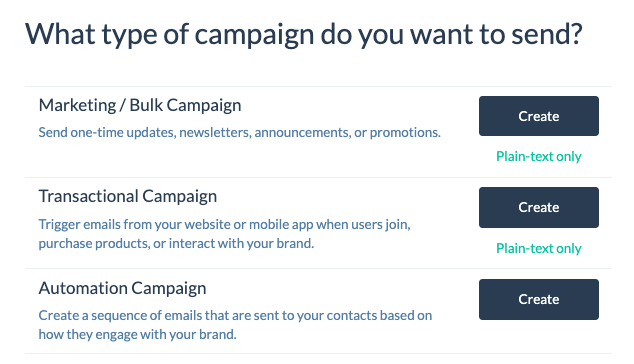
- Click on Campaigns tab in the site header, then on “Create Campaign” button.
- Click on “Create” under the Automation section.
Once on the Campaign page you need to give your Automation campaign a name, click on small “rename” tag next to name.

Click on “Add Email” to create your first email step, then click on “Edit” links to define each element of an email – trigger, message type, and segment (optional).
The most typical trigger for a 1st or only step in an Automation campaign is subscriber record being added to a specific list.
TIP: Create a List named Test and always use it for testing your automation campaigns before finalizing against customer list.
How to Add Contacts to a List:
There are several ways to add new contacts to a List in BigMailer.
- Manual import of a CSV file.
- An email collection webform that sends customer data to a List. In BigMailer you have 2 options, embed the form into your website or just link to a form as a standalone page on BigMailer.
- An API call (e.g. to create a contact when someone makes a purchase).
- An integration (when someone performs an action on a 3rd party platform a record of contact is created at BigMailer). So the data can first enter your CRM or a Google spreadsheet, then pushed to BigMailer.
- Manual adding of records one-by-one, useful for adding your own records for testing.
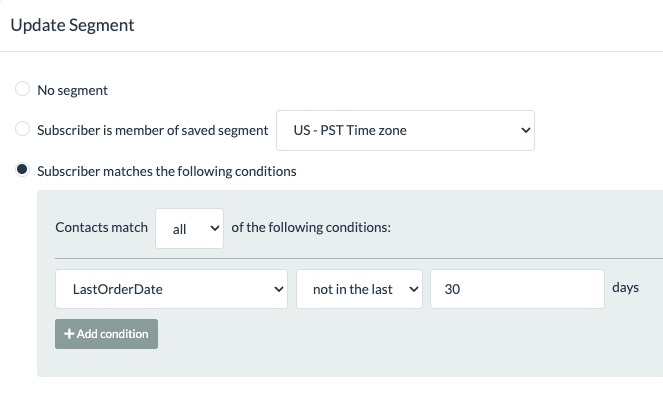
How to Include/Exclude Subscribers From Getting an Email
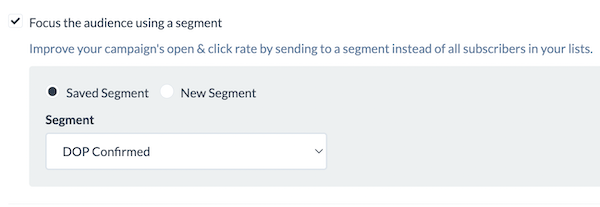
How to Setup an Double Opt-In Confirmation
Automation Campaign Analytics
Automation campaigns have the same analytics as marketing campaigns, once they are set live and emails are sent. As soon as you set your email Live and it’s no longer in Draft mode you will see “Report” option next to the email step in the email list view (see screenshots in the Automation Examples section above). You can see engagement metrics like open and click rates, as well as unsubscribes, bounces, and complaints for every email in an Automation campaign.
The stats for Automation campaign do NOT reset when an email is modified or moved around in a sequence. So if you want to track performance of a single step in a sequence you may want to pause the step and create a new version to replace it so you can compare engagement stats before/after the changes made.
Automation Campaign Types
1. A single welcome email sent when a new subscriber is added to the list or a sequence of emails.
2. An email sequence, for example on-boarding or nurture sequence with tips on using a product or advice from experts. This type of sequence can start with an event outside BigMailer and contact record is pushed to BigMailer via an integration or via an API call from an internal web application.
3. A marketing automation – an email or a sequence triggered by a customer interaction with a website or product. For example, if a subscriber visits a specific article they are tagged as interested in a given topic and sent relevant content or promotional emails. To set this up you have to add code to your website to fire an API call to BigMailer to either a) update your customer record with info on the action or interest or b) add that customer to a new List which can trigger an Automation campaign.
Automation Campaign Sending Logic and Troubleshooting
The emails in the Automation Campaign get sent if the there is an active email step when a trigger condition evaluates. When you create an email it starts in Draft mode until you set it live by clicking “Set Live“.

If you use a trigger based on adding contacts to a list the email step needs to be active before the contacts are added. To trigger an email the contacts can be added to a List either manually one by one for testing, in bulk via CSV import, or via on ongoing basis via signup forms.
The automation emails are scheduled at the time of the trigger event, ignoring any delay rules. So if the trigger for an email step is “after previous email is sent” then the email is scheduled as soon as the previous email is sent, regardless of a delay rule.
It’s not possible for a subscriber to receive the same sequence more than once, duplicates aren’t allowed in an automation campaign, to avoid unintended consequences.
Exiting a Sequence
The most common way for a susbscriber to exit a sequence is by being filtered out from the eligible segment. Another way that’s based on the action that happens on your website (e.g. a conversion event) you would need to:
- Setup a message type to use for your automation sequence, for example “Free trial on-boarding”
- When a subscriber completes a desired action on your website, for example upgrades to a paid subscription, you need to fire an Update Contact API call to BigMailer to unsubscribe them from a given message type that’s used by your automation sequence.
Message types are managed from the menu under your brand name in the header. When a new message type is added, all existing subscribers are automatically opted into it, e.g. they are eligible to get emails for that new message type. You can also place them into a new sequence by adding them to a new list, for example “Paid Subscribers”, in the same API call you make from your website or application.
Making and Testing Changes to a Sequence
Re-arranging steps for a live sequence, or changing delay rules, will not have impact on emails already scheduled.
One way to make changes to a live sequence is to copy the step you want to move, then pause original in its place and set live the new step in new place. This way you preserve stats for the original rules used. Using the copy and pause method doesn’t prevent any subscribers from receiving the same email twice, if the new email appears later in the same sequence. It’s just one way to not mix up stats for states before/after change is made. You can exclude subscribers from the new version using campaign engagement on a segment as “didn’t open any campaigns in X days” if there are no other emails being sent to subscriber (e.g. transactional).
Ready to get started? Click on Campaigns tab in the site header, then on “Create Campaign” button and select “Automation” campaign from the list. Don’t have a BigMailer account? Try out BigMailer with a free account.
Need assistance with your Automation Campaign? Reach out via chat icon once you log in, help is available 7 days a week.